manchego’s new kitchen: construction update

so much has happened at the new house. the walls came down!  you can get a much better sense of how big the kitchen is going to be, although the photos don’t really capture that.

2013-10-26 18.28.04

this used to be the bathroom! this photo is actually old – the room has been framed in.  every time i stop by the house, there is something new!

2013-11-28 16.03.52

this was the doorway down into the basement . . . soon to be my pantry!

2013-11-28 16.05.06

i didn’t get my hgtv moment with a sledgehammer, sadly. the contractor is trying to save as much of the original materials as possible. but there is plenty of new lumber going in . . . many many beams. the backyard looked like a lumberyard for a few weeks.

2013-11-28 16.03.36and a new ceiling for the addition.

2013-12-06 12.30.46

we found some fun stuff when we opened the walls. here you can see the back of the old plaster and lathe wall, and the back of the curve of the beautiful coved ceiling in the family room.

2013-11-24 13.07.44and these look like stickers or maybe some old wallpaper. the new venting and pipes are going to go in this nook, replacing the old brick chimney that served as an exhaust vent from the furnace in the basement. the chimney that likely was leaking CO2 and all sorts of terrible fumes into the house. the chimney that was about falling down, a complete hazard. the chimney whose bricks will someday form a raised bed for my tomatoes in the backyard. so many problems solved in one swoop.

2013-11-24 13.03.00

this is the old sash weight for the window – we think it is original to the house given its condition. most of the windows in the house are double sashed, and the weights help move the big heavy windows up and down.

2013-10-28 15.49.54

some of the things we found in the walls were of slightly more recent provenance. such as the many beer bottles and cans from the downstairs bathroom addition! the contractor seems to think they explain quite a lot about the quality of the construction, which was probably in March 1950 according to the newspaper clippings we found.

we’re going to have them wall up a nice empty wine bottle as our own little time capsule for whoever comes next and decides my white subway tile just must go!

the back of the house is another transformation. the deck came down – slightly dramatically with one of the construction workers standing on it! luckily, he is doing just fine, only a little banged up. certainly sped up the demo process, even if it was unintentional.

2013-12-23 11.12.16so, that’s it for now!


manchego’s new kitchen: that has got to go

ah, home renovations. everything takes longer than you think, right? we’ve spent the last few months doing our due diligence working through the city of sacramento’s permitting process. and now? now, there are honest to god contractors climbing all over my house. carefully taking off the 95 year old molding and woodwork, inspecting the electrical wires and pipes, looking super official with very large tool belts.

it’s awesome.

the house has really amazing bones. big closets. all that lovely built in wood. lots of natural light. but it needs a little help to be more of a modern house. the current kitchen? it’s two rooms. beyond retro. and completely closed off from the rest of the house. the second bathroom upstairs has a great cast iron tub . . . and the shower is in the second floor screened in porch. the back deck is an abomination. take a look.

Image

i mean, i guess it could be worse. but it is just such a waste of a view from the back yard. we’re going to get rid of all the busy stairs. instead, there will be two stacked decks. the lower deck will be a bit bigger and hopefully feel like part of the new kitchen. plus, the new deck will be made of real wood, not sad and crumbling fake wood. winning.

speaking of the kitchen, it’s behind this wall. which is on the demo list. in its place, picture a lovely peninsula and an open view through the kitchen to the back yard.  yes.

house2

can you see that second doorway? that leads to the old oven closet. or scullery? old houses had kitchens and sculleries, right? who knows. in any event, no one puts baby in the corner and no one should hide the cook in the scullery. 

house8

yeah, we are going to demo that wall too. and that charming sliding door will get relocated, maybe to the new pantry around the corner. the pantry that will be approximately 500 times larger than my current food storage space. and which will hold so, so many rolls of paper towels. and probably oversized buckets of pretzels (i am kevin’s daughter, after all). jars upon jars of pb&j for the somm. it’ll be like i’m a prepper, but just this side of crazy.

to the right of this photo is the kitchen.
house14

nice light. terrible floors. and don’t get me wrong. yellow is a great color for a kitchen. but that tile is intense.

house15

dark red accents? why not. it’s clearly a timeless combination. plus it has this raised border on the edge of the counter . . . i’m guessing it is super easy to keep clean and germ-free. ahem.

those are pretty major projects. there are some smaller, more cosmetic ones that i’m trying to tackle without the contractors.

here is the purple carpet on the back stairs. in all its glory. i’m really hoping it was crazy on sale.

2013-07-28 15.11.05

know what is under that? perfectly lovely real wood stairs. i’m going to paint them and cover them with carpeting that doesn’t hurt my soul. i’m excited.

here’s the other project.

house20

the last owner was meaning well, i am sure. the faux tiffany fixtures are remotely historically accurate. but they are also plastic. and also give off barely any light. also, i may have done some serious damage at the lumen’s sidewalk sale last week.

so fun. i can’t wait to go take pictures of giant holes in those walls. with that, i will leave you with a photo of our friendliest new neighbor.

2013-10-17 18.20.13

(PS: that screen door. totally needs a paint job. i may never go back to work!)

baking without butter and wheat

muffin3

i've been trying something a little new . . . gluten-free and/or vegan baking. this is partly because, well, i moved back to california. but also because my main baked goods audience has shrunk to the very lovely people who work for the somm.

and they HAVE to like my baking! it's a win win win.

just kidding. 

i'd already gone down the gluten-free road for the yogi. and after having read about how terrible wheat is for you.

plus there are so many fun types of flour out there! i now own about 10 varieties taking up precious freezer space. right next to my highly glutenized leftover bagel dough. whee!

i do not yet have an opinion on what type of flours i like best. luckily, there are many wonderful bloggers who regularly share their wisdom. i've been spending time with gluten-free girl who has many great recipes and some really lovely writing on her blog. she has a great post on how to put together your own gluten-free flour blend. it doesn't require you to buy anything that sounds too crazy (xanthan gum? seriously? isn't avoiding words like that WHY we bake at home?). 

almond and coconut were my gateway flours. who doesn't like almonds and coconut?

also, chocolate?

muffin2

i pulled this recipe from the new york times, which also likes them some gluten-free girl. i skimped on the bananas – don't do that! add plenty of chocolate chips. almond, buckwheat and rice flour are the stars here, but next time i'd cut back on the buckwheat. you want something lighter to really let the chocolate and banana sing.

served warm out of the oven, these didn't immediately seem gluten-free.  want a close up of that tender crumb?

muffin5

pretty normal, right? 

but do NOT give them to your vegan friends. there are eggs and buttermilk in there, the sneakers. plus, we've got something else for them.

muffin1

there are a number of vegan alternatives for eggs. so much good learning, and i would especially like to thank the kind woman who saved me from myself in the tofu aisle at the food co-op.

yeah, i'll pause to let that sink in. caleeefornia!

the tofu you want, that tofu is not in the refrigerator section of the market. it's the shelf-stable stuff. but i went for the flax seed slurry substitution. 

slurry! almost as good as shelf-stable tofu. 

just mix one teaspoon ground flax or chia seeds with three tablespoons hot water for every egg you're replacing. let the slurry sit, then add to the batter.

ground flax seeds can be found in the oatmeal and hot cereals section, NOT with the various gluten-free flours and starches in the baking section.

are you writing this down?

also, skip the honey and use agave. skip the buttermilk or yogurt and use unsweetened vanilla almond milk. 

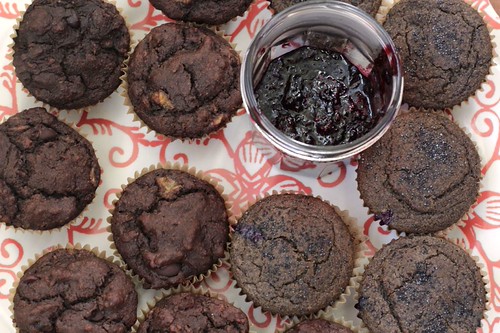
double the blueberries. whip yourself up some blackberry jam.

have yourself a muffin fest.

muffin4

Vegan & Gluten-Free Buckwheat Blueberry Poppyseed Muffins

Adapted to be vegan from the New York Times

  • 180 grams (1 1/4 cups, approximately) buckwheat flour
  • 100 grams (3/4 cup, approximately) gluten-free all-purpose flour mix or whole grain gluten-free mix*
  • 10 grams (2 teaspoons) baking powder
  • 5 grams (1 teaspoon) baking soda
  • 3.5 grams (1/2 rounded teaspoon) salt
  • 2 eggs or 2 teaspoon ground flax seeds mixed with 6 tablespoons hot water
  • 125 grams (1/3 cup) agave syrup
  • 360 grams (1 1/2 cups) unsweetened vanilla almond milk
  • 75 grams (1/3 cup) canola or grape seed oil
  • 5 grams (1 teaspoon) vanilla extract
  • 2 cups blueberries
  • 10 grams (1 tablespoon) poppy seeds (more to taste)

*For the gluten-free flour mix I used about 70 grams of a mix of teff, almond and rice flour and 30 grams of arrowroot starch.

Preheat the oven to 375 degrees with the rack adjusted to the middle. Oil muffin tins. Sift together the flours, baking powder, baking soda and salt into a medium bowl. Add any grainy bits remaining in the sifter to the bowl.

In a separate bowl combine ground flax seed and hot water. Stir and let sit for a minute. Beat in agave, almond milk, oil and vanilla extract. Whisk in the dry ingredients and mix until well combined. Do not beat for too long; a few lumps are fine but make sure there is no flour sitting at the bottom of the bowl. Fold in the blueberries and poppy seeds.

Using a spoon or ice cream scoop, fill muffin cups to the top. Place in the oven and bake 20 to 25 minutes, until lightly browned and well risen. Remove from the heat and if the muffins come out of the tins easily, remove from the tins and allow to cool on a rack. If they don’t release easily, allow to cool and then remove from the tins.

Best served with some sort of butter product (that means Earth Balance for you vegans) and jam.  

Yield: 12 muffins (1/3 cup muffin tins)

Advance preparation: These keep for a couple of days out of the refrigerator, for a few more days in the refrigerator, and for a few months in the freezer.


manchego’s new kitchen: built-in wood edition

guys. GUYS. we bought a house. not just any house. a 1918 craftsman.

it's beyond adorable. and the kitchen? beyond in need of updating. and by updating, i mean we are going to gut it, tear down an interior wall, and push out the back of the house. oh, and add a deck. and another upstairs. and redo three bathrooms.

no bigs, right? 

the somm is now accepting bets on if we move in by christmas or valentine's. HA.

anyway, since cooking and photography in our current little apartment (for which i am grateful, as it has running water and technically functional kitchen appliances) makes me very very sad, i'm going to try to use this space to document some of the befores and afters. and the excruciating process as i try to make decisions. and be patient. 

two of my very best qualities.

as the yogi would agree, life is not subtle when it hands you a learning opportunity.

house17b

the house has amazing light, but i'm still figuring out how to photograph it. particularly the gorgeous dark wood built-ins. this is the front staircase. 

there are TWO staircases. i mean, for real.

how do you like the purple carpet? you can barely make out it's plummy plumness, but it is there. and on the back staircase, which we will leave for another day. along with my crazy plan to rip it out and redo the stairs myself!

here's a close-up of the wood. 

house18

it's carved. i mean. seriously.

and here is the reason why i'm going to be investing in linseed oil futures:

house12

yes, that is a window seat!! with a lid and storage.

i may do a whole post exploring the many, MANY walk-in closets. it is possible that my storage in this house is larger than my entire first apartment. 

so, also purchasing some stock in california closets. i've learned that lesson.

any way, this is where the dining room table will be going. where i'm standing to take the photo is in the "formal" living room area, which is to the left when you come in the front door. and those stairs from the top are to the right of the front door.

i used the flash here to show more detail in the little wood cabinets in the dining area.

house13

pretty sweet. some of the glass needs to be repaired, which is on my mounting to-do list. 

when you continue through the house, the wood has been painted white. which i am secretly grateful for. i would never want to be the one to cover the wood up, but my heart was pretty set on a white kitchen and main living space.

house1

the wall on the left is going to be taken down, and this room will open up into the kitchen. there'll be a big peninsula in it's place with lots of counter space for the chef and for eating. 

the wood floors are also really beautiful. and probably original. you can see the nails, which is charming, and the downstairs rooms have this inlaid mahogany trim. and you see the coved ceiling? check out those darling little windows! i die.

this white built-in unit will get a new fresh coat of paint – i'm accepting color nominations! leave it white? go with a pop of color? and the mirror needs to go – maybe replaced with tile or even a pretty wallpaper that could also go on the back of the cabinets. which maybe need doors?

you see what i'm saying about decisions, yes?

here's another beautiful detail left in the house . . . so many original door knobs!

house9

there are some soul-suckingly horrible replacement doors here and there. also on the list.  

so, there is the tour of what is STAYING in the downstairs. next time, i'll show you all the stuff we are taking out. cheap home depot brass knobs and plastic "tiffany" light fixtures, you are on notice.

rustic potato loaves

pbread3

would you like some carbs with your carbs? if so, i have the bread for you. not messing around here . . . mashed potatoes, skins and all, are the basis of these hearty and crusty loaves.

good crusty bread is such a weakness of mine. i'm sure i've said it before . . . if it wouldn't put me in a chubby diabetic coma, i'd eat bread for every meal. with honey for breakfast, with cheese for lunch, wrapped around a chunk of dark chocolate with a sprinkle of salt for dessert. 

homemade bread, as i have waxed poetic here before, is both easy and so worth it. 

pbread4

this bread turned out a bit denser than i like. it's possible i did not bake it long enough. i get so used to underbaking brownies and cookies, it can be a struggle to let baked goods stay in the oven long enough when you actually want them to bake all the way through.

but no, it did not stop either myself or the somm from enjoying a whole loaf. in less time than i'm willing to disclose.

i think the tuesday's with dorie host for this recipe had the right idea, and swirled baked potato toppings in her bread . . . chedder, bacon and chopped green onions. this bread needs a bit of salt and fat to give it a real oomph.

pbread6

For links to the recipe and more, go to Tuesday's with Dorie Baking with Julia.


friday night pizza with onion confit

pizza5

growing up, fridays were always take-out pizza night. a night to relax the rules, rent a movie, and laze about on the sofa. no vegetables required. the whole of the weekend just stretching out ahead of you, full of promise.

this is a slightly more grown-up pie than the little cesar's extra pepperoni. but it hits all the right notes, salty and sweet toppings, chewy and crispy crust.

pizza3

making the pizza yourself is just as easy as ordering take-out – i promise. especially if you ditch the overly complicated dough recipe in the baking with julia cookbook. i tried it – and i tried to be fair.

but, ugh. kneading. rising. if i was faced with that everytime i wanted homemade pizza, i'd just buy the very very good dough from trader joe's.

people. it is so simple. flour. salt. yeast. this recipe uses sugar, but there's really no need. mix in the morning while your coffee is brewing. cover, and it'll be perfect and ready for you when you get home.

add toppings. bake. enjoy. capiche? 

pizza2

i won't pretend that onion confit is a friday night activity. it's time intense, but worth it to get the onions simmered down to a jam-like consistency. sweet with a hint of acid from a splash of red wine. a perfect complement to a scattering of blue cheese crumbles.

try that on a sunday, recapture a bit of the beginning of the weekend indulgence. i won't tell.

pizza1

Tuesdays with Dorie: Baking with Julia's Pizza with Onion Confit

Like I said, there are easy pizza dough recipes that do just as well – or better – than the one in the book and don't require multiple steps. So, I'm just going to link to my favorite. Jim Leahy. The man knows his dough. To read more, go to Tuesdays with Dorie or Boy Can Bake.

Pizza Dough

Notes for the linked recipe – you can use less yeast if you give the dough all day to rise. You don't need to bother with the sugar.

 Onion Confit

  • 3 tablespoons unsalted butter
  • 4 medium onions (about 2 1/2 pounds total), peeled, halved, and sliced 1/8to 1/4 inch thick
  • Salt and freshly ground black pepper to taste
  • 1 tablespoon sugar
  • Fresh thyme sprigs or leaves to taste
  • 1/4 to 1 1/2 cups red wine
  • 1/4 cup red wine vinegar

Melt the butter in a large heavy skillet and stir in the onions.  Season with salt and pepper, stir, cover the pan, and cook the onions over low heat until they are soft, about 5 minutes.  Sprinkle the sugar over the onions, stir, cover, and cook for another 5 minutes.

Add the thyme, 1 1/4 cups red wine, the vinegar, and a tablespoon or two of the creme de cassis, if you want to use it.  Stir well and cook the mixture over the lowest possible heat, stirring from time to time, for about 1 hour, until just about all the liquid has evaporated.  If the liquid has cooked off in half an hour or less, add a bit more wine.  Turn the onions out onto a flat plate and let them cool to room temperature.

The onions can be made up to 2 days ahead and kept covered in the refrigerator.  They should be brought to room temperature before they’re spread on the pizza.

Pulling it all Together

  • Dough
  • Onion Confit – relatively cool
  • Blue cheese or goat cheese crumbles
  • Any other topping your little heart could desire

Position a rack in the lower third of the oven, fit the rack with a baking stone or quarry tiles, leaving a border of at least 1 inch free all around and preheat the oven to 475o F.  Rub a baker’s peel with cornmeal and set aside until needed.

Shaping the Dough  Turn the dough out onto a lightly floured work surface (snip off a small piece of dough to save for the Mixed-Starter Bread if you want) and divide it into two pieces.  You’ll probably have to bake the pizzas one at a time, so keep one piece covered while you work with the other.  If you do not want to make two pizzas at this time, wrap one piece of dough tightly in plastic and store it in the refrigerator, where it will keep for a day or two, or wrap it airtight and freeze for up to a month.  Thaw frozen dough, still wrapped, overnight in the refrigerator.  Bring the chilled dough to cool room temperature before shaping.  Shape the dough into a ball and then flatten it into a disk.  To form the pizza, you can either turn and stretch the dough, stopping to allow the dough to rest for a few minutes if it springs back readily, or roll it out with a rolling pin.  Either way, work the dough until it is about 1/4 inch thick (you can make it a little thinner if you prefer) and transfer it to the peel.

Topping and Baking  Top with half the cooled onion confit and any or all of the optional ingredients, or the topping of your choice, leaving a 1-inch border around the rim of the pizza, and slide the pizza into the oven.  Bake for 13 to 15 minutes, or until the topping is bubbling and the uncovered rim is puffed and beautifully golden.  Repeat with the remaining dough and topping.


pretty darn good brownies

brownie3

we're back to baking with julia this week. i have so much catching up to do.

does this blog need yet another brownie recipe? probably not. but here you go! 

brownie4

julia, dorie and rich katz all seem to agree that these are the best-ever brownies. they are good. ridiculously fudgy. impossible to over-bake. 

the texture is light and creamy, in part from the technique, which has you hold back half the eggs and whip them into a fury. the bubbles help give the brownies structure without the weight of too much flour.

i threw in some walnuts at the request of a friend, and they added a nice crunch. 

brownie2

we've discussed my freezer issues before. in addition to loving to freeze unbaked cookies and all manner of other things for cooking, i love a good frozen baked good. the somm was the lucky recipient of various delightful thin mint treats for christmas that went straight to the freezer when we got home. there is something about the mint and chocolate combination that tastes right cold.

i really did try not to eat them all.

love you honey!

brownie5

anyway, the recipe promised that extreme fudginess would keep the brownies from fully freezing. thus making them supreme ice cream mix-ins. 

the frozen brownies lasted approximately five seconds in my house. so i pass the challenge onto michi, who has the added benefit of having her ice cream maker accessible in her home. rather than locked in storage container in the wild of the suburbs.

someday, dear ice cream maker, someday i will see you again. in the mean time, there is plenty of trouble to be had.

brownie1

want more fun tips on the recipe? new york times, to the rescue. in addition, this recipe was hosted by a beautiful mess through the tuesdays with dorie: baking with julia project.

Best-Ever Brownies
from Baking with Julia

1 1/4 cups sifted all-purpose flour
1 teaspoon salt
2 sticks (8 ounces) unsalted butter
4 ounces unsweetened chocolate, coarsely chopped
2 ounces bittersweet chocolate, coarsely chopped
2 cups sugar
1 teaspoon pure vanilla extract
4 large eggs

Center a rack in the oven and preheat the oven to 350 degrees.

Sift the flour and salt together and set aside.

Melt the butter and chocolate together in a medium saucepan over low heat, stirring frequently and keeping a watchful eye on the pot to make certain the chocolate does not scorch.  Add 1 cup of the sugar to the mixture and stir for half a minute, then remove the pan from the heat and stir in the vanilla.  Pour the mixture into a large bowl. 

Put the remaining 1 cup sugar and the eggs into the bowl of a mixer and whisk by hand just to combine.  LIttle by little, pour half the sugar and eggs into the chocolate mixture, stirring gently but constantly with a rubber spatula so that the eggs don't set from the heat.  Fit the whisk attachment to the mixer and whip the remaining sugar and eggs until they are pale, thick, and doubled in volume, about 3 minutes.  Using the rubber spatula, delicately fold the whipped eggs into the chocolate mixture.  When the eggs are almost completely incorporated, gently fold in the dry ingredients. 

Pour and scrape the batter into an unbuttered 9-inch square glass or ceramic pan.  Bake the brownies for 25-28 minutes, during which time they will rise a little and the top will turn dark and dry.  Cut into the center at about the 23-minutes mark to see how they are progressing.  They will be perfect if they are just barely set and still gooey.  Cool the brownies in the pan on a rack.  Cut into bars and serve.

The brownies will keep, covered, for 2-3 days at room temperature and can be frozen for up to a month!


farro with squash and kale

2013-02-10 20.33.14

we need to do something nice for ourselves. something healthy. something full of leafy greens. 

it is a bit of a selfish request, you see. i'm on a couch coughing my lungs up, surrounded by lozenge wrappers and half drunk cups of mint tea. i have a really divine fudgy brownie recipe, but it'll wait for later.

2013-02-10 20.33.31

this is not exactly a quick weeknight recipe. the three elements need to be cooked separately – the kale blanched, the squash roasted, and the farro is slowly simmered risotto-style. aka: lots of stirring.

but when the dish comes together, it is magically greater than the sum of its delicious parts.

2013-02-10 20.34.16

cooking the farro slowly, first by toasting the grains and then slowly adding chicken broth, results in a deeply nutty and meaty flavor. the grains stay al dente, with a nice firm bite. but the broth reduces down to an almost creamy sauce. it perfectly coats the kale. 

this all works because farro has the same starch as arborio rice. you get the same unctious mouth feel (how awful is that phrase!) but with a bit of whole grain goodness.  unless you're not into that type of thing.  i think farro might be a good grain? it's ancient, which i think is good.

ugh. nevermind, don't ask me. i've already got enough research projects for my cold-medicine-addled brain to manage.

what i do know? try to find the pearled farro. it won't take as long to cook. plus it sounds special.

2013-02-10 20.36.27

i used acorn squash here, as called for by the original recipe. but i'd bet you could open one of those super handy dandy packets of pre-cubed butternut and save yourself a few minutes of cursing as the vegetable peeler is gummed up yet again with squash skin as you're fruitlessly digging it into the narrow little acorn squash furrows.

does anyone know a better way to peel acorn squash? or was acorn squash really only meant to be halved, filled with butter and brown sugar and roasted? shall we leave the peeling and cubing for the slightly more ergonomically-inclined butternut squash? yes? good. glad we settled that.

either way you go, this is a really lovely comfort food. hearty and satisfying without being heavy. easily made vegan if you are so inclined. but also lovely with a sprinkle of parmesan cheese for those of us who like a little indulgence. 

i'm feeling better already.

2013-02-10 20.35.45

 Farro with Squash and Kale

From Epicurious.  Delicious as a side for a simple roasted chicken, or a main for meatless Mondays.

  • 3 tablespoons unsalted butter, divided
  • 1 small acorn squash, peeled, halved, seeded, cut into 1/2" cubes OR about a half a medium butternut squash, peeled, seeded, cut into 1/2" cubes
  • Kosher salt, freshly ground pepper
  • 1/2 bunch red Russian or other kale (about 5 ounces), center stems removed, leaves torn
  • 1 tablespoon vegetable oil
  • 3/4 cup farro
  • 1/4 cup diced white onion
  • 1 small garlic clove, very thinly sliced
  • 1/4 cup dry white wine
  • 2 cups chicken (or vegetable) stock mixed with 2 cups water, warmed
  • finely grated Parmesan, to taste

Preheat oven to 375°F. Melt 1 tablespoon butter in a medium saucepan. Add squash, season lightly with salt and pepper, and toss to coat. Spread out on a rimmed baking sheet. Roast, turning squash every 10 minutes, until tender, 30–35 minutes.

Cook kale in a large pot of boiling salted water until wilted, about 2 minutes. Transfer to a bowl of ice water to cool; drain.

Heat oil in a large ovenproof skillet over medium heat. Add farro; toss to coat. Roast in oven until toasted, stirring once, about 6 minutes. Transfer to a bowl; wipe out skillet.

Melt 2 tablespoons butter in same skillet over medium heat. Add onion and cook, stirring occasionally, until translucent, about 4 minutes. Add garlic; stir until aromatic, about 2 minutes. Add wine; increase heat to high. Stir until almost evaporated, about 2 minutes.

Add farro and 1/2 cup warm stock mixture. Stir until almost all liquid is absorbed, about 3 minutes.  Continue cooking, adding broth by 1/2 cupfuls, stirring and allowing broth to be absorbed between additions, until farro is tender. This will take between 30 and 45 minutes – maybe up to an hour.  I can usually tell when it is time to add more broth when you can drag your wooden spoon across the bottom of pan and the little liquid left stays parted for a few seconds. 

Add kale, squash; stir gently until vegetables are heated through, about 2 minutes. Season to taste with salt and pepper and a sprinkle of parmesan cheese.

homemade bagels

bagel3

there was this great story on npr the other morning about the "ikea effect." conventional wisdom has generally been that people spend time on the things they love. the researchers being the ikea effect posit the thought that spending time on things is it's own active force in building that love and sense of emotional connection. 

the idea that the more effort you put into something, say building a slightly wonky bookcase, the more you care about that object. even if you were slightly overly aggressive with your new power drill and the screws came poking through the decorative finish.

whatevs. that totally didn't happen to me last night.

ps: my cooking magazines finally have a home! hurrah!

bagel1

i've been spending a fair amount of my time recently on fairly ridiculous diy projects. like baby quilts. there is no economy of scale to making them at home, friends, but the many many hours i've spent on them has made me pretty happy. and i hope when the new mommas see the puckers and imperfections, they love the quilt all the more for knowing it was made with love. 

my grandmother, as the napkin in the photo below can attest, had way better skillz than i. those are vintage, friends, and still immaculate. 

bagel4

turns out, making homemade bagels is pretty akin to other ambitious diy projects. particularly if you, like me, are not overly detail oriented. there are a lot of steps, people. things get both sticky and slippery, if you can believe it. rounds of dough may go flying.  

i tried to go for more of a pretzel bagel, under the somewhat shaky logic that i've previously succeeded in boil-and-bake efforts on that front. plus, i like a bagel with a nice chew, and a good firm skin. so, i added about four times the baking soda to the bagel bath. it gave them this lovely pretzel color.

still can't quite tell if that helped make them look more appealing?

bagel6

in any event, they tasted not too shabby in both the poppy seed and kosher salt varieties. slightly underbaked, the way i like them, so nice and moist in the middle even on day two. they ended up being monster sized. i froze some leftover dough that may become reasonably sized bagels for the new, lower carb manchego's kitchen of 2013.

i know. i can't believe i typed that either.

more shocking? i stopped drinking coffee. back in california less than 6 months and i'm already going granola on you. i spared you photos of my blueprint juice experiement, so just be grateful.

bagel5

low carb or not, i'm back at the baking with julia challenge. there are muffins and brownies and all sorts of terribly wonderful things headed this way. if you want to head down the bagel bunny hole, visit the tuesdays with dorie blog or heather's bytes.

pumpkin cranberry bread

_MG_7222b

this fall felt so long and warm, i thought that winter would never really come to california. when the cold finally began to hit, it came as a bright surprise, a delicious reason to hunt for boot and socks and layers of long sleeves. for a mug of afternoon tea and slice of buttered toast.

you look like you could use a piece of toast too. and not just any piece of toast will do to drive away the now lingering chill in the air.

particularly if your work furnace, like mine, emits any number of lovely knocking sounds but not much actual heat.

_MG_7195

this isn't your typical pumpkin bread, dense and spicy. it's an airy yeast bread. the cranberries burst in your mouth with a tart contrast to the lightly sweet, faintly pumpkin bread and crunchy toasty walnuts.

_MG_7219

this is the perfect antidote to the post-holiday season food slump, offering comfort without excess.  it may not be quite as virtuous as salad with grilled chicken, but it's a far cry from a platter of christmas fudge.  

_MG_7201

i am so sadly off track with tuesdays with dorie. you don't want to know how long these photos have languished in my camera. but find out by going to tuesdays with dorie or this bountiful backyard to find the recipe and lots of blog coverage.