leek bread pudding

serving of pudding

what is the difference between savory bread pudding and stuffing?

this is not a trick question.  or maybe it is a trick question?

to start with, savory bread pudding is a delightful treat you make in the middle of a regular old week (not thanksgiving) and serve it to some of your BFFs rather than 40 odd relatives.

plus, you don't stuff it in a bird.  which i think is kind of gross. 

don't get me wrong.  i love stuffing.  thanksgiving isn't thanksgiving without stuffing made from grandma renee's amazing tauzin family recipe.  but i make it in a casserole dish the way FDA inspectors, harold mcgee, and god (in that order) intended.

i'm not going to compare this bread pudding with that stuffing though.  bird of a different feather.  both tasty, neither really need a recipe.  stuffing is more crumbly and scoopable, but this bread pudding is more of a sliceable-custard-based dish.  and i think the brioche and the leeks make it a little more fancy pants.

check out those leeks!  fancy!

leeks

more importantly, check out the new saute pan!  i've made the leap, friends, from nonstick to, well, very sticky.  it resulted in this:

not nonstick

and it resulted in me scrubbing at it for quite a bit of time.  did i not add enough butter?  i'm pretty sure that can't be it. should i have "deglazed" the pan with water?  the learning curve of adult cookware.  sigh.

anyway, i'm getting ahead of myself.

the leeks get a cute little parchment hat while they're gumming up my shiny new pan.  this recipe is from our friend thomas keller and he just has this thing for parchment hats. 

i mean, parchment lids. 

that's what grown-ups would call them.

crispy, golden brown brioche croutons give this bread pudding some serious body. 

bread crumbs

the croutons, plus a nice sprinkling of parmesan cheese give this bread pudding a nice crunchy bite on the top and a lovely chewy border – like the crusty corners that make everything from brownies to kugels to baked pastas so yumtastic. 

top of pudding

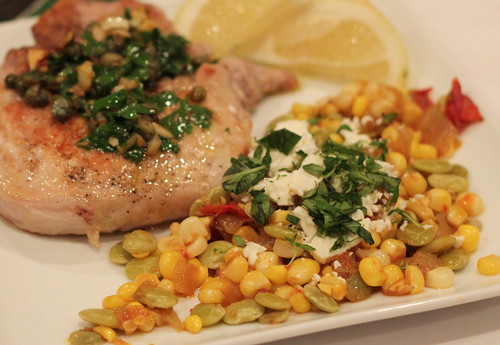
this is a seriously satisfying dish.  light, but rich, good warm out of the oven or room temperature.  i served it with pork tenderloin (you're SHOCKED) and asparagus (sorry michael pollan), but i think it would have been really lovely just with a green salad, dressed with something light and lemony.

Leek Bread Pudding

Lightly Adapted from Ad Hoc at Home and Smitten Kitchen

I'll be honest, I didn't really measure anything for this recipe.  So I give you approximations as being exact isn't super important here.

  • 2 cups leeks, cut into 1/2 inch rounds
  • 4 tbsp butter, cut in four pieces
  • 4-6 cups challah or brioche bread, cut into 1/2 inch squares
  • 2 eggs
  • 1 cup cream
  • 2 cups whole milk
  • Nutmeg, salt, pepper to taste
  • 1 tbsp fresh thyme leaves
  • 1 tbsp chopped chives
  • 3/4 cup (or more!  live large!) grated parmesan or other tangy cheese

Preheat your oven to 350 degrees.

Make your parchment paper hat.  Cut a round of parchment paper the size of your saute pan, then fold it up like you're making a paper snowflake and cut a little hole in the center to let out the steam.  Or, you know, decide that Thomas Keller is too precious for you and skip it.

Warm up your saute pan, and add the leeks.  Saute until they start to soften and throw off some liquid, stirring, for about 5 minutes.  Then add the butter and top with your parchment lid and let it melt down over mediumish heat for about 20 minutes, stirring a few times.

Toast your bread cubes in the oven for about 20 minutes, stirring midway so the croutons get more or less evenly toasted. 

Combine the leeks and the croutons.

In another bowl, combine the eggs, milk, herbs, nutmeg and salt and pepper. 

Grease your pan.  Sprinkle about 1/4 cup of cheese on the bottom.  Add about half of the leeks and croutons, then a layer of 1/4 cup of cheese, then the rest of the croutons, then the rest of the cheese. 

Here, Thomas Keller recommends adding about 2 cups of the milk mixture, pressing the croutons to get them good and soaked, and letting it rest for 20 minutes before adding the remainder of the milk mixture and then baking for about an hour or until firm.

I skipped this because it was getting late and I was hungry and had promised to feed people on a school night and thought that they would appreciate dinner slightly before midnight.  It turned out ok.  The top layer of croutons were probably a little drier than they otherwise would have been.  So, if you have the patience and the time, soak your croutons.

Enjoy!

salted mudslide cookies

salted mudslides

booze + chocolate + salt = a winning combination.

these are some intensely chocolaty cookies.  they may be posing with the hershey's, but don't be fooled.  there's more than that in here.

mocha kahlua.  dark cocoa powder.  dark chocolate chips.  a smattering of that fancy-pants sea salt.

manchego

it's manchego-approved, so you know it's good.

in fact, the somm tried one and was sure that whoever i'd baked them for probably didn't deserve them.

not true!  happy 30th to mishap! 

these cookies were almost better than our miami celebration trip.  luckily, the hurricane-gale-force winds died down and the sun came out or it might not have been so close. 

warning: these cookies may not be conducive to a bikini-ready body, but just TRY to only eat one.  they're gooey and rich.  they have a perfect chewy edge.  and the salt just kicks it up a notch.

cookie tray

i finally found a trick to getting salt to stay on the top of cookies.  it's a little weird.  are you ready?

take cookies out of oven. quickly spritz with pam.  apply salt.

neat, huh?

i still can't figure out how to get turbinado sugar to stay crunchy on muffins.  i think i'm just going to need to practice! 

maybe we should start with another batch of cookies.

upclose

Salted Mudslide Cookies

Loosely adapted from How Sweet It Is

  • 2 cups + 2 tablespoons all-purpose flour
  • 1/2 teaspoons baking soda
  • 1/4 cup dark cocoa powder
  • 3 tablespoons instant coffee powder (I ran out and just used more cocoa powder)
  • 1/4 teaspoon sea salt
  • 1 stick (1/2 cup) of unsalted butter, melted and cooled for 10-15 minutes
  • 1 cup brown sugar
  • 1/2 cup sugar
  • 1 egg + 1 egg yolk, at room temperature
  • 2 teaspoons vanilla extract
  • 1/4 cup coffee liqueur + 1 teaspoon (I used Mocha Kahlua for an extra chocolate kick)
  • 1 cup chocolate chunks
  • sea salt for topping

Preheat oven to 325 degrees.

Stir together the flour, cocoa, salt and baking soda in a bowl and set aside.

In another bowl, mix the melted butter and sugars until they are combined. Next add your liquids – egg, vanilla, Kahlua. 

Gradually add flour and mix until a dough forms – it will be a little more crumbly than most cookie dough but should come together.

Fold in the chocolate chunks. Refrigerate dough for 30 minutes.  Be patient.  Remember you didn't have to remember to soften your butter, so you have to make up for it somewhere.  Your reward: puffy, chewy yumminess.

Scoop balls of dough onto a greased or nonstick baking sheet.  I went for about 1tablespoon-sized scoops because I was bringing them into work.  Bigger scoops would probably maximize the gooey, chewy character of the cookie.

Bake for 10-12 minutes or until the edges are set and the middles are still soft. The centers should be puffy. Do not over bake.

Remove from oven.  Working three cookies at a time, immediately give each a spritz of Pam or other cooking spray (just not the kind with flour!) and then sprinkle with sea salt.

Good warm, cooled, or unbaked. 

honey bourbon & peach bbq chicken

peach bourbon chicken tableset

what do you do when someone offers to come to your house on a sunday evening and bake you a chocolate pie?

make them this chicken in return.  it's like saying i love you, in tangy, sweet poultry form.

this is not a fancy recipe.

peach bourbon chicken cast

it was created by the pioneer woman.  let me tell you, she knows her comfort food.

want to play with the camera?

check out the peach jam!

peach bourbon chicken preserves

whoa, wait!  there's that honey bourbon!  betcha thought we were done with that bad boy! 

peach bourbon chicken jd

this recipe got us close, but there is still a good inch or so left in the bottle. 

and don't let it's honey sweetness fool you.  this is a gateway drug to more serious whiskey.  it is possible a bottle of makers mark has made it to my place of work.  it is certain that i was not responsible.  but it is possible that i have partaken.

goes great with diet ginger ale.  and a caramel apple lollipop.  as you cry silently at your desk.

wait, too serious?  back to the food!  focus!

this recipe is essentially a braise.  oh man, get ready.  fall is here for reals and i'm going to be braising so much meat you won't be able to keep up.  how else can i be sure my favorite short rib recipe is really my favorite?!?!

but today, we are cooking the bock bock.  that's chicken for those of you who don't speak paige.

peach bourbon chicken chix

chicken thighs are great for braises.  they're virtually indestructible – have you ever had a dry chicken thigh?  just ask spilled milk.  i browned up some bone-in, skin-on for some juicy goodness.  and then boneless skinless because i'm lazy and would like to not gain 10 lbs every weekend.  plus my yogi is uncomfortable with meat-looking meat. 

let it hang out in the oven with all that good bbq sauce, peach jam, and bourbon until it falls apart.  serve with smashed potatoes, and maybe some green beans for good measure. 

this sauce is crazy addictive.  you'll want more than seconds because it just hits every note right – sweet, savory, with just a hit of the bourbon.  just use a bbq sauce that has a bite – you want to balance out the jam.  and if you choose a good jam, it'll be a little chunky.  it's a substantial sauce, let me tell you.

peach bourbon chicken upclose

bonus?  it goes great with chocolate pie.  thanks larkin!

Peach-Whiskey Barbeque Chicken

All I did was swap out the bourbon for honey bourbon, so you should just check out Pioneer Woman's recipe posting.  She'll walk you right through the recipe, but it's easy as pie.  Promise.


baby artichokes, i win

baby artichokes

aren’t they cute?  they look so innocent.  you can almost hear them whisper: hello.  i’m small, adorable and green.  take me home and turn me into something yummy!

devious little buggers.

first few times i tried to make some magic with baby artichokes, i just couldn’t get it right.  and to be honest, the problem was me.

a confession – i hate kitchen waste.  i hate, for example, peeling a watermelon and feeling like half the watermelon is still attached to the rind.

i had to do breathing exercises to get through my knife skills class because to make those exquisite, perfect, 2 in by 1/4 in by 1/4 carrot batons or petit brunoise potato dice, you leave most of the vegetable behind.

control issues?  what do you mean control issues?

anyway.  you have to let that go with the baby artichokes.  check this out.

artichoke carnage

i don’t know if you can tell, but the pile of discarded baby artichoke leaves DWARFS the tender, pale green hearts.

but friends, you must be ruthless.  if you don’t, your baby artichokes will end up woody.  inedible.  they will mock you from under their yummy, tangy, lemony glaze.

if you truly can leave no artichoke leaf behind, go find yourself one of those jumbo dudes.  i’ll even share my momma’s top secret artichoke cooking technique.

are you ready? 

wrap in plastic wrap and nuke it until it’s tender.  try not to think about whatever it is that’s leeching into your food fromthe plastic.  melt some butter (also feel free to nuke that).  good to go.  is there anything better? 

did i hear you say aioli?  yeah, that works.  or mayo, on a spoon from the jar.  no biggie.

anyway, back to our petit artichauts.  now that you’ve gone and really stripped them down, you’re ready to introduce them to their friends lemon, garlic, white wine, and thyme. 

they’re going to get along swimmingly.

sauteing artichokes

let me tell you, these were some tasty artichokes.  they were tender and sweet.  the dressing was a wonderful balance of acid and tart and savory herbally goodness. 

but, jeez louise, they just aren’t as adorable as they were at the start, right?

bowl of artichokes

this leads me to lesson number two today.  i didn’t get my artichokes soaking in lemon water quite soon enough, and the artichokes went from green to . . . a, uh, slightly less appetizing tan color.

the irony – and i may need an english teacher here to tell me if this is real irony or alanis morissette irony – it was my endless futzing with them for photographs that kept them from the lemon bath they needed to look good in the photographs. 

the somm feels their pain, let me tell you. 

so, don’t be like me.  strip your artichokes, soak your artichokes, serve them to the ones you love.

Artichoke Antipasto

Not at all adapted from David Tanis’ Heart of the Artichoke, unless you count my smart-ass, alcoholic asides.  Original recipe here, buy the book here.

  • 10 to 12 baby artichokes
  • Zest and juice of one lemon
  • Olive oil
  • 1/3 cupish white wine
  • 3-4 sprigs of thyme
  • 2 small garlic cloves, chopped
  • Small pinch red pepper flakes
  • Parsley to taste

Open the bottle of wine, pour yourself a glass.  Quality control.

Fill a bowl with water and squeeze in the lemon juice.  Don’t be shy.

Tell the baby artichokes their time has come.  One at a time, chop off about the top third of each artichoke, or maybe a little less.  Pull off the hard green outer leaves until just the tender lighter green leaves are left.  Slice them in half, lengthwise, and add them to the lemon water.  Immediately.

Heat your (non-cast iron) skillet and add olive oil and let it get warm.  Drain the artichokes and add them to the pan with some salt and pepper.  Then add the wine and thyme and simmer, uncovered, stirring occasionally, until the artichokes are tender when you test them with a fork, about 10 minutes.

Add the garlic and red pepper flakes (to taste!), and cook for a minute or so until the garlic starts to smell and loses that raw garlic bite.

Take the pan off the heat, add the lemon zest and parsley.  I don’t think I added the parsley.  I’m not a huge fan, plus my little plant hasn’t been doing so well, and I honestly just never really remember to garnish.  But, by all means.  Arugula would also probably work here.

David Tanis says you can let them cool to room temperature to serve as a part of an antipasto platter.  They didn’t really last that long for us.  Nom.

pseudo single lady eggplant caponata

eggplant 018

i do a lot of pseudo-single-lady cooking.  forget rachel ray, if the somm is out of town, dinner needs to take about 15 minutes to get from the fridge into my mouth.  this tends to limit the repertoire to, well, zucchini hash and a fried egg if i can muster the energy to chop something.  or olives and a very large glass of wine if it’s been one of those days.

yeah. classy.  i’ll be sure to get that recipe up here one of these days.

anyway, when i’m a pseudo-single-lady who has her $%*! together and isn’t too hangry at the world to cope with cooking, i’ll make a big pot of something that’ll last all week to use in various forms for lunch and dinner.  like a big pork tenderloin or a pot of braised chicken that’ll go in salads or on pasta.  mmm.

this is one of those type of recipes.

eggplant caponata is kind of like the italian version of ratatouille.  but it has more eggplant than tomato.  and you chop the veggies up into smaller pieces.

IMG_2609

and unlike tomatoey ratatouille, which i melt into almost a stew, the eggplant in caponata tends to hold its shape and texture even as you saute and simmer it.  and it ends up more as a dip.  or like salsa?  do you know what i’m getting at here?

IMG_2621

the type of caponata i like to make is pretty tangy.  lots of capers and olives and some red wine or sherry vinegar to zing it up.

the secret ingredient?  pine nuts.

no one would call a pine nut crunchy.  but against the silky smooth texture of the eggplant, tomato, and red pepper, they give the caponata a much needed bite.  and a nice toasty, nutty layer of flavor to the dish.

IMG_2623

don’t be like me and totally forget about your pine nuts and let them get slightly too toasty on one side while staying oddly nakedly blonde on the other.

just keepin’ it real, folks.

so, i’ve made caponata for family dinners when the somm’s home.  i made a huge batch, and it just got better all week.  the yogi came over and we spread it on french bread, crumbled some feta on top, broiled it and had it in our faces in under 15 minutes, FTW.

look, here i’ve served it with pork.

IMG_2630

shocking, i know.  i pretty much have served everything i’ve made this summer with pork.  thank god it’s dropping into winter weather this weekend so i can give my old friends the short ribs some love.

Eggplant Caponata

Adapted from the New York Times

  • 2 tablespoons olive oil
  • 1 large onion, chopped
  • 3 large garlic cloves, minced
  • 2 red bell peppers, diced
  • 1 1/2 pounds eggplant, chopped into 1/2ish cubes or close enough (see note)
  • 2 medium to large ripe tomatoes, diced (and peeled if you’re feeling fancy), or half a 14-ounce can diced tomatoes
  • 3 heaped tablespoons capers, drained
  • 3 tablespoons coarsely chopped pitted kalamata olives
  • 2 tablespoons tomato paste
  • 3 tablespoons red wine or sherry vinegar
  • 1 good splash of red wine
  • Salt and Pepper
  • 1/3 cup pine nuts, toasted

Heat your oil in your skillet, add the onions and saute for a few minutes.  You probably don’t want to let them brown because they’ve got some more cooking to do, but I can never remember to stir and I’m usually chopping the eggplant or garlic and forget, and it works out ok.

Add the garlic and red bell pepper and saute for another few minutes to get the pepper softening.  Then add your eggplant and cook until it gets a little brown – maybe 10 minutes or so.

Add your tomatoes, olives, and capers, cook for a few minutes then add the tomato paste and liquids.  Cook until the liquid is just gone and the sauce holds together.  Taste it and see if the balance of tart and savory is right for you or if it needs more vinegar or maybe even a pinch of sugar.  Season with salt and pepper to taste.

You can either add the pine nuts now, or you can reserve and garnish as needed.  This helps keep them from going too soft in my opinion.

Caponata is best served warm or room temperature, but it’s pretty darn good on crackers straight out of the fridge too.

A note about eggplants: Many people find eggplant to be bitter if you don’t salt it first.  I usually buy the lighter purple eggplants.  Or the funky streaky looking ones. In part, if I’m being honest, cause they’re kind of prettier.  But I also think they’re sweeter and less bitter than the darker ones.  And I’m lazy and that’s my excuse to not salt my eggplant.  Feel free to salt yours if you have the patience or desire.  Also, the New York Times has you roast your eggplant.  I like the firm bite of a non-roasted eggplant, and didn’t really want to add the prep time, but I’m sure it’s lovely either way.  Aren’t you so glad you came for all this (not) helpful (completely subjective, not tested) advice!


kettlecorn ice cream

popcorn ice cream

um, why did i wait until the end of summer to get the ice cream cookbook du jour?  (du summer?  du l'été?  sorry aunt k.) 

let me just say, better late than never.  i got my mom on the bandwagon too, and she's the real homemade ice cream artisan in the family. 

everyone in foodie blog land loves this cookbook.  jeni's flavor combinations are really amazing: sweet corn & black raspberry; basil & honeyed pine nuts; cucumber, honeydew & cayenne.  i seriously considered just working my way through the damn thing: one ice cream a week!  for a year!  then i remembered my thighs.  hi friends.  we don't really need that much for reals ice cream around, right?

but the best thing about the cookbook is the basic ice cream recipe.  the recipe is, SERIOUSLY, a revelation.  especially for dorks like me who tend to produce scrambled eggs instead of ice cream custard no matter how much tempering and whisking occurs.  

pre-jeni, the land of homemade ice cream was a choice of philadelphia-style cream and sugar ice cream or the richer french egg-based custards.  jeni has use science, SCIENCE! to move us beyond this.  the secret ingredients are cream cheese, corn starch, and corn syrup.

sounds weird, i know.

but, the result?  the ice cream really is creamer and smoother than most ice creams i've made, and lasted longer in the freeze. 

IMG_2748

if you buy jeni's cookbook . . . which you should if you ever plan to make homemade ice cream . . . she has a long, interesting explanation of why her recipe version works.  the short version is that it balanced the water, fat, protein and air to make ice cream taste like the best thing you've ever put in your mouth.  not gritty.  not cloying.  just right.

kettlecorn isn't actually a flavor from jeni's ice cream book.  it was inspired by a recipe for popcorn ice cream that i've been dreaming about for a month. 

we're big popcorn fans around my house.  you can usually tell whether the somm is home or not by the level of popcorn detritus on the floor. 

sweeping: one of my favorite household tasks.  if only i'd do it with any regularity. 

isn't kettlecorn the best type of popcorn?  sweet and salty and buttery.  this ice cream does all of those things.

IMG_2749

did you know you can pop popcorn in a brown lunch bag?  for reals.  turns out, there is nothing magical about the orville redenbacher bag, no matter what criss angel says.

pop some up, melt it into your warm ice cream base to infuse it with popcorn goodness.  proceed with your ice cream recipe, but amp up the salt. 

IMG_2752

sprinkle some more sea salt on top (maybe that fancy flowerpetal sea salt you picked up in spain?  yes?  no, you don't keep that on hand?) and you'll have the sweet-salty goodness of kettlecorn, but with the creamy-cold goodness of ice cream.

flickr

mmm.  stay tuned because the ice cream flavor that is next up is goat cheese and drunken figs courtesy of my momma.

Kettlecorn Ice Cream

Using Jeni's recipe & Inspired by Dash & Bella's Popcorn Ice Cream

  • 2 cups whole milk
  • 1 tablespoon plus 1 teaspoon cornstarch
  • 1 1/2 ounces cream cheese, softened
  • 1/4 to 1/2 teaspoon salt, plus more for sprinkling
  • 1 1/4 heavy cream
  • 2/3 cup sugar
  • 2 tablespoons light corn syrup
  • 4 cups air popped popcorn (about 1/4 cup unpopped) without salt or oil

WARNING: you need approximately 15 large bowls and various other accoutrement.  This recipe relies on mise-en-place.  I hope you have a dishwasher.  Trust me, it's worth it.  Also, you need an ice cream maker.  They aren't that expensive.  I have a Cuisinart that's about 4 years old and it's fantastic. 

To pop your popcorn, put 1/4 cup popcorn kernels in a brown paper bag, fold over the top several times and microwave for a few minutes, listening for the popping to stop.  Put the popcorn into a large bowl.

Fill a large bowl with ice water.

In a small bowl, mix 2 tablespoons of the milk with the cornstarch.

In another large bowl, whisk the cream cheese and salt until smooth.

In a saucepan, bring the remaining milk with the heavy cream, sugar, and corn syrup to a boil and cook over moderate heat until the sugar dissolves, about 4 minutes. Don't let it scald! 

Take the warm mixture off the heat, and add  it to the popcorn gradually.  Stir until the popcorn mostly melts.  I didn't get it to totally melt.  Strain the mixture back into the pan, pressing on the popcorn solids to get all the liquid out.

Gradually whisk in the cornstarch mixture. Return to a boil and cook over moderately high heat until the mixture is slightly thickened, about 1 minute.

Turn off the heat, and slowly whisk the cream cheese mixture into the milk until it's smooth.  Pour your ice cream base into a big plastic ziploc bag and seal.  Set the bag into the ice water and chill for about an hour, adding ice if you need to to get it nice and cold. 

Follow your ice cream maker's instructions to freeze, then cure your ice cream in the freezer until firm.

end of summer dinner

IMG_2820

when i’m trying to decide what to cook or bake, i don’t usually start with a recipe, i start with an ingredient.

i mean, those peaches were macerating in bourbon in my head (while lurking despondently in my fridge) for WEEKS before i found the recipe (recipes!) to make it happen for reals.

case in point – if there are lima beans at the farmers market, there will be succotash.  you know how i feel about food with fun-sounding names!

however.

i have a three-foot stack of old bon apetits and gourmets (RIP gourmet, RIP) and cooking lights.  which i’m slowly going through, ripping out the dog-eared pages to fill what is likely to be a series of three ring binders.

f1

this binder lives on a shelf.  next to my growing collection of cookbooks.

f2

and i LOVE my cookbooks, and most were gifts.  my godmother sent me off into my first apartment with a set of classics. (barefoot contessa. silver palate. joy of cooking.)

my current cookbook-fairy is also my mother-in-law (ad hoc at home . . . i didn’t post-it every page, but mostly just beacuse i skipped the fish section).

my cookbooks are like my wedding gifts.  they aren’t just objects, they’re the presence of the love of my friends and family.  in my kitchen, where that kind of love always feels strongest.

and even though i’m far from having as many cookbooks one of my favorite food bloggers, i’m trying to follow her advice: stop buying, and start cooking!

so, let’s get on with business.

two recipes today: on-the-fly succotash, and david tanis’ pork scallopine.

poor lima beans are one of the somms favorites even though i think their reputation is on par with anchovies.

to be honest, i’m still working on the anchovies. (ok, well, i’ve purchased a can of anchovies and i’m just getting used to it’s presence in the kitchen.  maybe someday i’ll actually open it and consider cooking with the little fishies.)

but limas, limas are great.

IMG_2808

you don’t really need a recipe for this – melt some butter.  add your corn and limas.  season and saute.  add your tomatoes, if you’re using them.

IMG_2816

cook till tender!  squeeze in a little lemon juice to tart it up.  top with goat cheese and basil.  delish.  and you really don’t need any more of a recipe than that.

succotash is so simple, i paired it with pork from an actual recipe.  from an actual cookbook.  this one:

heart-of-the-artichoke1

this was a christmas gift from my mom that had a good run over the winter (braises!  blood orange granita!) and i’ve now made at least three recipes from the summer menus.  his recipes range from a whole suckling pig (seriously people?!?) to simple, good food.  green beans with red onions.  this pork with lemon and capers.

the recipe was supposed to be for scaloppine – which is a fancy italian way of saying thinly sliced meat often lightly dredged in flour, and if you were wondering, wondra flour is the best for that cause it’s super fine so you can actually lightly bread stuff before sauteeing it.  this is how the pros get that nice brown crust on meats.

i had pork chops.  so i just wondra-ed them up and got to work.

while the pork rests, you saute parsley, lemon zest, capers and garlic in olive oil and those wondra-fied porky leavings until it sizzles.

IMG_2819

spoon over the pork.  serve with lemon wedges, and a scoop of late summer succotash.

let’s go in for a close up.

IMG_2821

The irony of course, is that you don’t really need the recipe for the pork any more than you do for the succotash.  but it was a great idea, and for that i’d like to thank both david tanis and my mom.

My Version of David Tanis’ Pork Scaloppine

Adapted from Heart of the Artichoke and here 

  • Wondra flour
  • 4 pork chops
  • 2 Tbsp. roughly chopped parsley
  • 2 tsp. thinly sliced lemon zest
  • 1 Tbsp. capers , rinsed and roughly chopped
  • 2 cloves garlic , finely chopped
  • Lemon slices

Heat olive oil in a skillet.  Sprinkly both sides of your chops with salt, pepper and a light dusting of Wondra.  Brown chops on both sides for a few minutes until 135 or 140 degrees in the center.  Or until desired level of done-ness.

Remove pork from skillet, add another splash of olive oil.  Add parsley, lemon zest, capers and garlic.  Saute until it sizzles.  Spoon over pork chops and serve with a wedge of lemon on the side.


honey bourbon peach brown bettys

IMG_2741

so, i had some subpar peaches.

well, i'm sure they were fine peaches.  but i have become a total peach snob.  i like autumn glo peaches from kuhn orchards.  they're the essence of peach.  the flavor is perfectly sweet and round.  there is none of that undercurrent of acid you get with other peaches sometimes.

you can buy them saturdays at the u st farmers market in dc between 9 and 2 for the next two weeks.  i bet that is super convenient for you.  you're welcome.

luckily, i also have a recipe for how you should use the subpar peaches available in your own local grocery or farmer's market.  it even works if you have perhaps forgotten them in the crisper bin for a week or two. 

or, even if you haven't forgotten them, but it just takes you a week or so to get your hands on bourbon because you live on the east coast and they don't sell booze in your local CVS or even GROCERY STORE like civilized people.

because you're gonna need some bourbon.  i went jack daniels tennessee honey.  just seemed like the right thing to do.

IMG_2709

you know what makes peaches awesome?  a good soaking in bourbon, with a little thyme.  and bourbon whipped cream, but we're getting to that soon.

IMG_2710

this recipe is a riff on a smitten kitchen brown betty recipe. the appeal of other fruit desserts like crisps and cobblers is easy to understand: sugary, crunchy streusel topping!  light, flaky biscuits! 

but the brown betty elevates humble sandwich bread to yummy new heights.

IMG_2714

you start with a layer of butter and a sprinkle of sugar in the muffin tin.  this is going to brown-up and get caramel-y like no one's businesses.  more butter, and then the peach-breadcrumb-bourbon-brown sugar goodness will seal the deal.

IMG_2722

according to my friend wikipedia, brown bettys date to colonial times.  also, they were nancy reagan's favorite dessert.  who knew?

they – or at least the bourbon whipped cream – are even manchego approved.

IMG_2732

baby betties!  ready to par-tay!

IMG_2726


Honey Bourbon Peach Brown Bettys

Adapted from Smitten Kitchen

  • 3 cups peeled, chopped peaches
  • 1/4 cup plus 2 tablespoons honey bourbon (I used Jack Daniel Tennessee Honey because the nice liquor store clerk said it was less sweet than other honey bourbons, and I figured the recipe would be otherwise sweet enough.)
  • 2 tablespoons fresh thyme leaves
  • Melted butter
  • Granulated sugar
  • 6-8 slices white sandwich bread, crusts removed
  • 1/3 cup packed dark brown sugar
  • 1/4 teaspoon salt
  • 3/4 cup panko
  • Whipping cream

Preheat oven to 350 degrees.

Stir together your chopped peaches, bourbon, and thyme leaves.  Let hang out in the fridge for a few hours macerating and getting yummy.  This mix also goes great in sangria with white wine.  Maybe with some thyme or mint simple syrup.  Mmmm.

Mix your macerated peaches with the panko, salt and sugar.  I bet some nutmeg would also be delightful in here if you're feeling fancy.

Flatten the bread slices with a rolling pin.  Or a clean wine bottle if that's what you've got. 

Brush some butter in your muffin tin, and sprinkle with granulated sugar.  Line the tins with the bread.  I used both full size muffin tins (full slice of bread) and my mini muffin tin.  For the mini muffins, I tore the bread into four pieces and two pieces for each tin.  Just play with it, it doesn't have to be perfect.  And, like with pie crust, you can use bits of bread to plug and holes.

Once you have your crust, brush with more butter.  Fill with peach filling, pressing slightly to pack it in.  This will help with the integrity of your bettys, especially if you've got a lot of hole filling that has gone on in the crust creation. 

You're going to bake these guys first with foil on top (10 min for regular muffins, 7ish for minis), then uncovered to get them brown (15-20 for big guys, 10-12 for minis).  I also then broiled the top of mine because I wanted the tops to brown more.  Cause I was taking them to a party and I thought looks mattered, and there there was no light on the rooftop deck.  But you're going to cover them in whipped cream, so maybe you don't have to be OCD like me.  Or maybe Smitten Kitchen is wrong and they should just be baked uncovered the whole time?  Maybe I'll have to make 5 more batches to see!!!!

While the bettys are baking, whip some cream with a little sugar and some bourbon.  Let the bettys cool just a smidge, top with cream and enjoy!

banana muffins

IMG_2697

usually, ripe bananas mean just one thing to me: chocolate chip banana bread.

it's the standby classic.  made it a million times.  have totally convinced myself that since it is a cooking light recipe and contains yogurt, it is healthy even when i add nearly an entire bag of chocolate chips.  MMMMMM.

but, sometimes you just need a muffin, you know?

this muffin is lighter, but somehow less virtuous than banana bread.  more purely banana.  but with butter. 

plus, it has that crispy muffin top you know you crave.  this is why you must bake and consume muffins on the same day. 

IMG_2686

and muffins take way way less time to bake.  a total win.

Banana Muffins

Not at all adapted from a Spilled Milk podcast

  • 10 ounces (2 cups) unbleached all-purpose flour
  • 7 ounces (1 cup) sugar
  • 1 teaspoon baking powder
  • 1/2 teaspoon baking soda
  • 1/2 teaspoon table sat
  • 13 ounces mashed very ripe banana (about 3 bananas)
  • 3 ounces (1/3 cup) buttermilk
  • 2 large eggs
  • 6 tablespoons unsalted butter, melted
  • 1 teaspoon vanilla extract

Preheat the oven to 375°F. Spray a muffin tin with nonstick spray. (I like Baker's Joy or another spray with flour in it.)

Whisk together flour, sugar, baking powder, baking soda, and salt in a bowl. Stir together the mashed banana, butter, egg, buttermilk, and vanilla in another bowl. (I like to mash the banana in a large bowl and then stir in the rest of the wet ingredients.) Add the dry ingredients and fold in gently until just combined.

Drop the batter into the muffin tin cups and bake until you get a nice brown ring around the edge of the each muffin top, about 22 minutes. Check for doneness with a toothpick. Cool 5 minutes in the pan, then turn out onto a wire rack and serve warm.

Yield: 12 muffins

romesco sauce

IMG_2526

we can do this the easy way or the hard way.

no, seriously.

there are a lot of steps here.

there are lots of ingredients to toast or roast and peel.  soak and chop.  saute and puree.  here are some of them.  the photogenic ones!  also the ones i didn’t forget to pose.

IMG_2480

note to self: do not become a wedding photographer.  although, who ever looks at those lined up photos anyway???   sigh.  two years later, i still have post-traumatic bridal stress disorder.

back to the romesco.  it makes everything better.  we even served it at the wedding.  at the meats on sticks station!  yum.

and don’t worry.  about the wedding or all the steps to the romesco sauce.  they’re worth it.  and they’re (generally) a great way to spend a saturday afternoon. and i’ll tell you when you can cheat – in the sauce, not the marriage.

are we done with that metaphor?  i hope so.

romesco is a spanish sauce that is mostly peppers, tomatoes, nuts and bread.  sounds weird but it is deeply satisfying.  it’s smoky, with a nice balance of sweet and bitter peppers, a touch of acid, a little chunky.  it’s a substantial sauce.  there are lots of ingredient and lots of steps, but don’t  be intimidated.  that just means lots of ways to make romesco the way YOU want it to be.

here’s how i make romesco.  i roast something.

IMG_2474

i take a break and go sweep the cat litter in the bathroom.  i wash my hands.  thoroughly.  gross.  i come back and toast something.  something like hazelnuts.

IMG_2489

then i go wipe down a counter or water a plant.  i have house cleaning ADHD.

back to the kitchen!  we’re going to take the skins off stuff!

roasted red pepper.  after you thoroughly blacken the skin – either on the stove or under the broiler, turning constantly! – let it hang out in a ziploc and get steamy.  then the blackened skin slips right off.  super easy.  but you know what?  the stuff that comes in a jar works too! and looks slightly less creepy than this denuded red pepper.

IMG_2497

the secret to taking those skins of the hazelnuts is rubbing them in a dishtowel.  a nubbier towel would have worked better than this, but isn’t it pretty?!  thanks mom.

IMG_2502

hazelnuts are a traditional ingredient for romesco.  toasting them offers deeper flavor – and taking the skins off will make a prettier sauce.  i mixed them with marcona almonds (fancy pants spanish almonds that are super salty and a little oily but in a good-put-more-in-my-mouth-right-now kind of way) but you could just use marcona almonds.  or just regular almonds.  whatever floats your boat.

also going on during my toasting/roasting/prep/cleaning time is soaking some ancho chiles.  nora chiles are traditionally the central ingredient in a romesco.

my whole foods doesn’t carry them, and grocery stores are limited here in the urban metropolis that is NW DC. i’m pretty sure i couldn’t pick a nora pepper out in a line up.  ancho chiles, according to my “extensive” research, are a common substitute in romesco.

but, here’s the “secret” to my romesco.

it really is more of a glorified red pepper sauce.  i like the sweetness.  i add the ancho for a little bit of that smoky bitterness.  but whenever i try to go old school and use mostly dried peppers, i am just disappointed.

and, there are way too many steps here to not luuuuuurve the results.  because once you’ve roasted and toasted and soaked and chopped, you need to saute the ingredients together.  let them meet and mingle.  cocktail hour style.

IMG_2504

in this stage, you’re adding the bread, tomatoes, and garlic.

they’ll really get to know each other in the food processor.

IMG_2510

in a nod to the somm, i don’t add oil to make it saucy.  i used some chicken stock and some spanish white wine . . . this time a viura-chardonnay blend.  viura.  the somm and i spent our whole trip to rioja making people say it for us and failing to replicate the sound.  the v . . . not a v.  some weird v/f hybrid.  the inflection . . . much more nuanced than the american tongue is prepared to take on.  who would have thought txakolina would be easier to say!  sigh.

luckily, romesco is SUPER easy to pronounce.  and super easy to make, if you can stick through the roasting-toasting-soaking-chopping.

IMG_2518

and good on so much stuff.  burgers.  roasted potatoes.  crudites.  a spoon.  dig in!

Roasted Red Pepper Romesco

Super loosely adapted from the New York TImesRead the article about the awesomeness of romesco!

Smitten Kitchen has a good recipe too.

  • 2 red peppers
  • 3-4 peppadew peppers (or just use more red pepper or piquillo, like the NY Times)
  • 1 dried ancho chile
  • 1 medium to largish tomato
  • 6 cloves garlic (I am garlic CRAZY.  use as much as seems reasonable to you)
  • Handful hazelnuts (NY Times called for 15.  Hilarious.  Please, do not bother counting out your hazelnuts)
  • Larger handful marcona almonds (or, you know, 25)
  • 1 cup cubed baguette, stale or slightly toasted
  • 1/3 cup white wine
  • 1/3 cup chicken stock
  • 1 tablespoon sherry vinegar
  • 1 healthy sqeeze of lemon juice
  • 1/2 teaspoon smoked paprika (This is Spanish paprika.  I bought mine in Spain.  You don’t need to, they sell it here, but don’t use regular paprika, it won’t get the job done.)
  • Chopped fresh thyme

Soak ancho chile in hot water for about half an hour until soft.  Remove seeds.  Roughly chop.

Blacken the red peppers over a gas flame or under the broiler.  Place in a ziploc bag for 5 to 10 minutes, then slip off skins. Coarsely chop.

Toast hazelnuts until dark brown but not black.  Fold into dish towel and rub to remove skins.

Slice slight X in bottom of tomato – just enough to break the skin.  Blanche in boiling water for a minute, then peel.  Or skip this because you just can’t handle peeling ONE MORE THING.  Use canned tomatoes.  Or just leave the skin on.  It’ll add some fiber, that’s good, right?

Saute bread, nuts, garlic for a few minutes, until you can start to smell the garlic.  Add the tomatos.  Then the peppers.

Throw the mixture into the food processor.  Start the processor.  As it runs, add the liquids.  Season to taste with paprika, salt and pepper.  Garnish the with fresh thyme.  The sauce will have texture.  Delicious texture.